In Indian scenario if you are planning to install Home Solar energy plant to save your electricity bill, then you are doing a big blunder. It’s better to invest that amount in a good mutual fund or as a long term fixed deposit, you will be able to pay the electricity bill with the return/interest from that amount. However if you are in a place where power failure is more frequent then it’s a good option
First and foremost thing before going for a Solar power plant is the knowledge about your load. Don’t think about running Electric motors, Refrigerators, Air conditioners etc in a Solar power plant. However if you want a completely off the grid solution for multiple reasons, can go for high capacity plants (2 KW to 5 KW) . In normal domestic usage consider the light loads like Fan, TV, Music Systems, Lights etc. More the number of appliances less the backup time, hence it is better to keep the appliances minimum and tap the maximum backup time from the plant.
DC Only Solar Energy System.
For a small family I personally suggest DC Only Solar system. As the name suggests in this system all appliances are directly working on DC. Before going for such a system, you must take care of your requirements. Here if we take only the Lights and Fans (The most essential load), the system will be more economical. If your requirement is to run one or two fans and two to three lights, then go for this system. A complete DC Solar energy system in this setup will cost you only Rs 25,000 to 35,000 including the cost of Battery, DC Fans and Lights. Here the main advantage is you can completely avoid inverter and the energy loss due to the energy conversion. However if you want to run your TV, Music system and other appliances forget about this and go for the inverter based solar power plant.
SOLAR INVERTERS
Solar inverters are the heart of a solar plant. It is very much important to know the basic features and specifications of a Solar inverter.
Capacity: Capacity of the inverter is the maximum load that you can be connected with the inverter. For example if the capacity of a Solar inverter is 1 Kilowatt, you can connect maximum 1 KW load to that inverter. 1 Kilowatt is considered sufficient for average home usage. If money permits, you can go upto 2KW also, anything beyond that for home usage won’t be economical.
Output: Don’t compromise on the output waveform of the inverters. It must be Sine wave. Fortunately most of the leading solar inverter firms are supplying sine wave inverters only in solar segment.
Other features: Unlike normal inverters, solar inverters have many unique features to make it more energy efficient and to tap the maximum benefits from the solar panels.
Maximum Solar energy benefit: Solar inverters charge battery bank with the power output from Solar panels during daytime. A typical 1 Kilowatt Home solar power plant takes five to six hours for charging the battery. If you are not completely drain out the battery during night time, it will take much less time to charge the battery full during the next day. Once the battery gets fully charged in one or two hours, in normal solar inverters rest of the useful solar energy will be wasted. In some solar inverters once the battery is fully charged, the power conditioning circuitry automatically cut the mains supply and Solar Panel battery combination will power the devices through inverter. Here during daytime effective and full utilization of solar power can be achieved.
Metering: Apart from the battery charging status, power on/off, battery low, mains on/off indications, modern solar inverters are incorporated with energy meters which logs the energy usage from solar panels/mains, net daily/monthly energy usage etc.
Programmable Controls: Modern solar inverters facilitates programmable energy control system. Here you can effectively decide what energy should be used when.
How solar inverters differ from normal inverters?
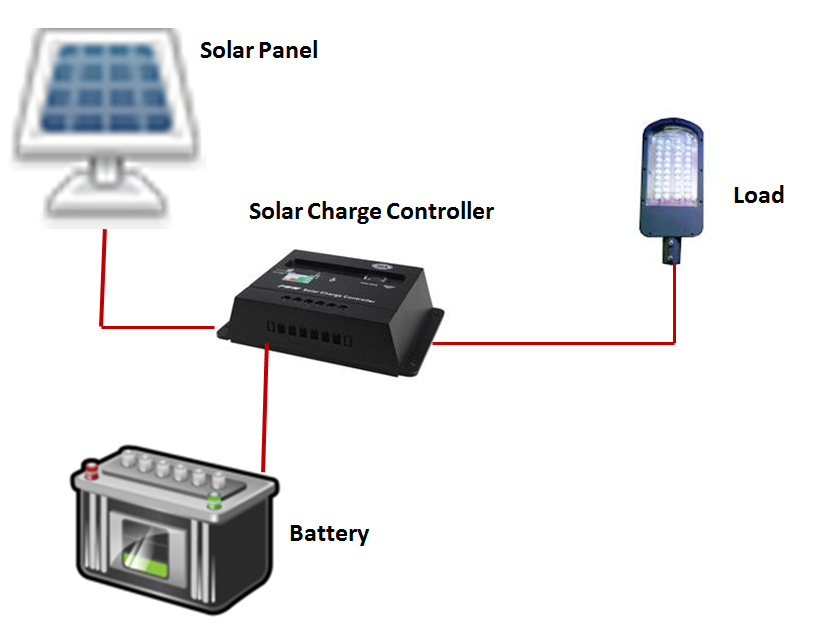
Inverter portion of both solar an normal inverters are same. In solar inverters the additional part is solar charge controller and associated switching circuits. Apart from the battery terminals solar inverters have two additional terminals to connect solar panels of suitable rating. Whenever sufficient sunlight is available, the output from solar panel will be utilized for charging the battery, which can brings down your electricity bill.
Is it possible to convert a normal inverter to a solar inverter?
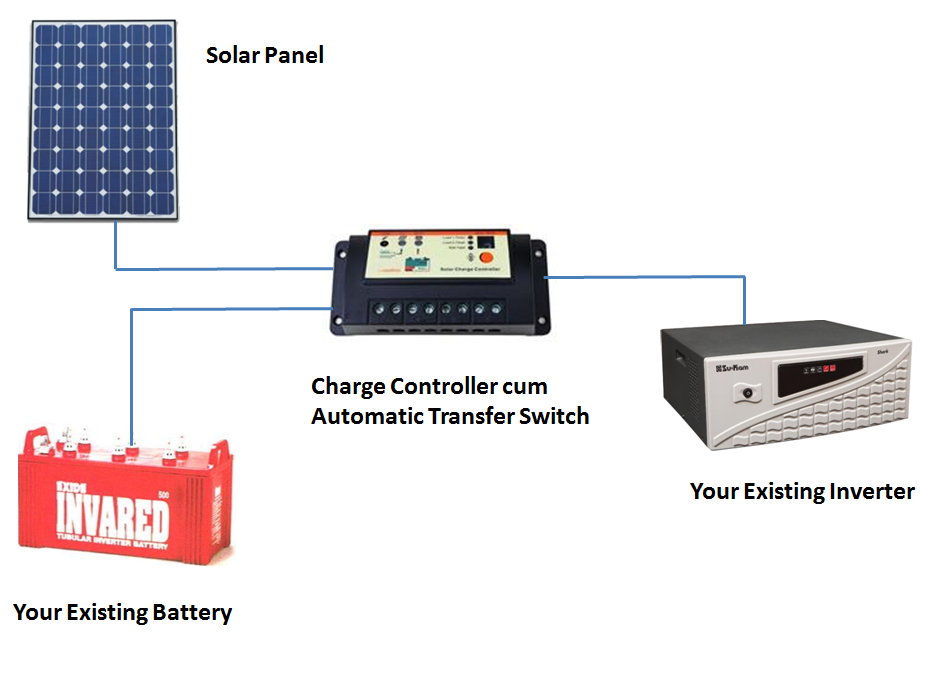
Yes, you can convert a normal inverter to a Solar inverter. Several firms are offering Solar Charge Controllers along with Automatic Transfer Switch which can couple the Solar panels with your existing inverter and battery. You just need to connect the Device as per the connection details.
When sufficient output available from Solar panels to charge the battery, it will be sensed by the intelligent automatic transfer switch and routed to battery. In this time mains supply will not be utilized for charging purpose. Whenever the solar output falls below the rated voltage, mains input from inverter will be used for battery charging.
What is grid tied solar inverters?
Grid tied inverters are coupled to main utility grid. Here the DC output from solar panel is converted to AC and coupled with the grid through a special type of energy meter known as Netmeter. Unlike normal energy meters, net meters are bi-directional. Here the solar energy is used as a supplement to the grid power. Grid tied inverters convert the DC power input from Solar panels to AC and feed the same to utility grid through Netmeter. If your solar panel is generating more energy than your domestic requirement, the excess energy will be credited to the grid, means you can sell the energy to the utility grid.
Here grid tied inverters can not be used as a backup device as in the case of off line inverters. When mains grid power fails, as a safety measure inverter will not generate electricity. A circuit senses the power failure and cut off the inverter from main grid . This avoid risk to the line workers. In India you can’t use these type of inverters because the grid system is not yet modified for this.
Pros and Cons of Grid tied inverter
Less maintenance as not battery or charging circuits are used.
Bring down your electricity bill by feeding the excess power to grid.
Cons
Can’t be used as a backup to main supply.
Can’t use everywhere. Utility grid of the country must support these type of inverters.
What is a solar- wind hybrid inverter?
Solar- Wind hybrid inverters have separate input terminals to tap the energy from wind turbine and Solar panels. Charge controllers and regulators of Solar and wind turbines are different, hence separate charge controllers, regulators and associated switching circuits work as a bridge.
Can I use solar panel output directly to run devices?
Yes, you can run the equipment like fans, LED lights, pumps etc directly without using battery, but as the output of Solar panels are not steady due to clouds, bad weather etc, it’s not advisable to run the appliances which require stable voltage. However with suitable regulators, you can very easily run low power devices. Solar pumps works directly on the direct input from Solar panels. Solar pump is a combination of a DC motor and a centrifugal pump. Solar submersible pump sets are also available. Solar pump sets are extremely useful where Grid power supply is not accessible. In India a typical 1 HP , 500 W input 24 volt solar pumpset costs 35000 to 40000 without the cost of Solar panel and fittings. A complete set can cost around Rs 1 Lakh. These pump set can deliver around 1500 liters of water per hour on sunny days.
Power requirements and Solar Panel Selection
Here the deciding factor is your average monthly/yearly energy consumption. It can be very easily calculated by using your one year’s electricity bill. Your winter and summer electricity requirements considerably varies hence the average electricity usage of of the whole year can give a fair usage value. If your average monthly usage is 150 Units, then the daily usage is 150/30 = 5 Units or 5 KWh, means at an average you need 5 Kilo Watt hour energy. Now you have to calculate the size (wattage) of the Solar panels required to meet this energy requirement. Here one thing you must keep in mind that, distribution or availability of solar energy is depends on the geographical locations. The usable hours of solar energy available varies from point to point. Isolation map indicates the average monthly/yearly availability of usable sunlight . Here see the Solar Resources map indicates average annual sunlight hours available across various places in India (prepared by Ministry of New and Renewable Energy – Govt of India )

From the map let’s take an average value of 5 sunlight hours per day. Now we can use the formula
Solar panel Wattage = Daily Power requirement / (Average Sunlight Hours x Efficiency of the system)
In our case daily power requirement = 5 KWh
Average Sunlight Hours = 5 hrs
Efficiency of the system = say 80% = 0.8 (Here the conversion losses of inverters, solar charge controllers, battery and wiring are taken )
Now The solar panel wattage requirement = 5/(5×0.8)= 1.25Kilo Watts Per day.
This indicates you need 1.25 KW solar panels to meet your complete energy requirements. Solar panels are available in different Wattage/Voltage combinations. Normally low wattage panels (Upto 100Watts) comes with 12 Volt output and High Wattage panels comes with 24 Volts output. If your inverter is above 1 KV, naturally the input battery requirement will be 24 Volts or 48 Volts. In the above quoted example you can use Six to Seven 200 Watts Solar panels are required to generate 1.25 KW power for your complete energy requirement.
Solar panels wiring
You won’t get a single solar panel to meet the whole power requirement, for that you have to use the suitable combination of multiple panels as per the specification of your system.
As a source of energy, solar panels work as battery. In series connection the voltage of individual panels get added up and current (Wattage) Remains same. For example if you connect two 100 Watts 12 Volt solar panels in series (Positive terminal of the first panel to the negative terminal of second panel) , the net voltage will be 24 Volts but the power remains same (100Watts).
In parallel combination of panels the current/wattage added up and the voltage remains same. If you connect two 100 Watts 12 Volt Solar panels in parallel (Positive terminal of first panel to positive terminal of second panels and negative terminal to negative terminal) the power/current get added up and voltage remains same means the net wattage of panels will be 200 Watts 12 Volt. You can use series- parallel combination of multiple panels to meet desired voltage and power requirement. See the figure.
If you are planning to install a 1 Kilo Watt plant, then have to go for Five 200 Watts 12 Volts panels and connect the same in parallel. One important thing you must keep in mind that a 200 Watt panel cannot give exact 200 Watt power always. The rated power inscribed on the panel is on Standard Testing Conditions, in practical field conditions, it can go down. Standard Test Conditions indicates mainly the Standard Temperature (25 Degree Celsius) and Solar energy intensity (1000 W/Sq Mtr).
Temperature Coefficient of Solar Panels:
Power output from Solar panel varies according to the temperature. Normally a 200 Watts Solar panel give the rated output at 25 Degree Celsius. If temperature go above this point say 30 to 35 Degree, power output reduces accordingly. Excessive heat can reduce the output by 10 to 20%. If the temperature coefficient is marked as minus 0.5% per degree in a Solar panel, it indicates the power reduction of 0.5% on every degree raise in temperature over 25 Degree Celsius. In a sunny day if the temperature goes around 45 Degree Centigrade, the power output will be reduced by 10%.
Conversely,if temperature come down below 25 Degree, the opposite action take places, means power increases according to the same ratio. Means in the sunny day of winter, a Solar panel will give its optimum output.
Power Tolerance of Solar Panels
Power tolerance of a Solar Panel is the range of upward or downward variation of power generated with respect to the Standard Power Output. For example, a 250-watt panel with a ±5% power tolerance means under standard test conditions the power generated by the solar panels varies from 237.5 Watts to 262.5 Watts. Go for a panel with minimum power tolerance ratings. Nowadays panels with 3% power tolerance level are available in market.
Types of Solar Panels
Solar panels are mainly classified in to three .
Monocrystaline panels
Polycrystalline Panels
Thin Film Amorphous panels
Monocrystalline Solar Panels
Single Crystalline Solar panels of Mono Crystalline Solar panels are the panels which are made of Mono Crystalline Silicon. These panels can be identified by the physical appearance itself. Due to high purity of Silicon colour of these panels are dark blue. Mono Crystalline panels are made of the Wafers sliced from the cylindrical Silicon ingots. See the figure.
Advantages and Disadvantages of Mono Crystalline Solar Panels.
Advantages
As Monocrystalline solar panels are made with pure grade of Silicon, efficiency of these type these type of panels are very high, typically 15 to 20%.
Less space required. As compared to other type of panels Mono Crystalline panels are space efficient. For a specified power output, space required by these panels are considerably less than thin film and Poly Crystalline panels.
Long life- Life of the Mono crystalline panels are very high as compared with other type of panels.
Better performance in cooler conditions
Disadvantages
Polycrystalline Panels
These type of panels use multi crystalline Silicon . Here the raw silicon is melted and molded to make square wafers. Here multiple small crystals make a module. We can identify the Poly Crystalline Solar panels through the physical appearance. Bluish shade distinguish poly crystalline panels from mono crystalline panels . Unlike mono crystalline panels these panels don’t have cut edges. These type of Solar panels are most common in domestic usage.
 Advantages Poly Crystalline Solar Panels
Due to less production cost, Poly Crystalline Solar Panels are comparatively cheaper.
Comparatively better performance in hot conditions
Good life span.
Disadvantages
Thin Film Amorphous Solar Panels
Thin film solar panels are of relatively new technology solar panels. These type of panels consist of layers of photovoltaic materials about 10 nm thick compared with 200- to 300-nm layers for crystalline-silicon cells. Due to poor efficiency these type of panels are not used for home solar energy applications. Moreover area per wattage requirements of these panels are very high as compared with mono/poly crystalline panels.
Type of Mountings
You must take extreme care while selecting the panel mounting. Vendors may supply substandard mild steel mounting, which will be rusted rusted and collapsed within a couple of years. You have the choice of Powder coated Mild steel, Galvanized Mild Steel, Aluminium and Stainless steel mountings. Need not to mention that Stainless steel and Aluminium mountings are the best , especially if you are living in coastal area.
Batteries for Solar power plant
Battery requirement of a Solar power plant is depends upon the Solar Panel wattage and inverter capacity. A 1 Kilowatt solar power plant requires an inverter with a power rating of minimum 1 Kilowatt or more. For a 1 Kilowatt inverter, the operating voltage will be 24 Volts. Hence minimum two 12 Volts batteries in series connection is mandatory. More number of batteries will give more backup, but it requires more charging time too. For a typical 1 Kilowatt Solar home power plant 24 Volts 300 Ah battery bank is considered ideal.
Normally Valve Regulated Lead Acid batteries (VRLA) are used in home solar power plants. These batteries are of deep discharge type designed to charge rapidly and can be discharged utpo the minimum level. Normal Automotive lead acid batteries are not suitable for solar inverters. If you are worried about the maintenance of the battery bank, then it is advisable to go for maintenance free sealed lead acid batteries. Cost of SMF batteries are a little bit higher than normal VRLA and tubular batteries.
How and where to position solar panels?
To get the maximum output from solar panels, it must be positioned at a suitable angle as per the geographical location. Earth’s position of sun varies through out the year, but changing the angle of Solar panels Every time in accordance that is not practicable. If you have a fixed mount, it is advisable to fix the panels at an angle which gives optimum output throughout in al seasons. For getting complete sunlight from sun’s East to West track, solar panels are required to be mounted south facing with angle of tilt as per the season.
Life of Solar panels
We can see 25 years warranty claims come with every solar panels. This 25 years warranty is a gimmick. Solar panels can live even many more years than this 25 years mark, but the question you must ask after few years say five years how much power it can give. This is the actual warranty/guarantee term. Normally output of Solar panels decreases due to ageing and other environmental factors. Some manufactures assure 99 to 100% output utpo first 10 years. The assurance of 80% power output after 25 years can not be considered as a benchmark. A panel which guarantees 100% power output will be superior than that one.
As per MNRE specifications A solar panel must give minimum 90% output upto 10 years and 80% output after 25 Years. Normally the extent of guarantee is theReplenishment of lost power due to ageing only.
Space requirement for a home solar power plant
For a typical 1 Kilowatt Solar power plant, minimum 100 Square feet shadow free plane area is essential. It can be roof top also. Size of the solar panels varies as per the wattage rating of Solar panels. A 200 watt poly crystalline panel has a dimension of 1.5 Mtr x 1 Mtr x 1 Inch (Length x Width x Thickness). Cost of the panel varies from Rs 60 to 100 per watts.
Solar Calculator Applications
These Android application will help you to decide the size of home solar power plant as per your energy requirement.
At an average how much energy I will get from a 100 Watt solar panel per year?
A 100 Watts panel can give maximum 0.5 unit electricity per day. Means per month 15 Units per month. A 1 Kilowatt Solar plant can give 4 to 5 Unit electricity per day.
Solar panel efficiency
Efficiency – the ration of input solar energy to output electric energy is very much poor in world’s most efficient solar panel. In lab environments maximum achieved energy efficiency is 40% only, but which is far away from the real world situations. Practically the efficiency of off the shelf solar panels varies from 15 to 20% only.
What is solar charge controller?
Solar charge controller or charge regulator is an essential requirement for a solar energy system. Output from a 100W 12 V solar panel is not always 12 V through out the day. It varies from minimum 12 Volts to Maximum 18 Volt as per the sunlight. Means a 100 Watt Solar panels is designed to cater 100Watt power at an average. Solar charge controllers couples the solar panels with battery by regulating the fluctuating output from solar panels. A good charge controller prevent under and over charging of connected batteries. It prevents the reverse current flow from battery to panels under poor sunlight conditions and night. Additionally charge controllers give protection against battery and panel reverse polarity.
Will solar panels work in cloudy, foggy and rainy seasons?
Yes, Solar panels work in such bad light conditions also. Solar panels are designed to give the rated output even in poor sunlight conditions also. Here panels give more output than the rated value in good sunlight conditions.
What is Solar tracking system? Is it necessary for me?
Sun light has two components, direct and diffused. Here direct beam consists 90% of the solar energy. Solar tracker is a mechanical system which keeps the solar panels always facing towards sun . This will increase the overall efficiency of the plant by taping the optimum energy. For normal home solar energy plants, trackers are not necessary and it’s not value for money also. However in big solar plants (Mega watts range) it’s mandatory to extract the full benefit of the system.
Can I expand the capacity of the plant by adding more panels in future?
Yes you can, your inverter must be compatible for that with suitable ratings.
Roof mounting or Ground mounting. Which one is more advisable?
Normally people prefer roof mounting because of space constraints and availability of shadow free area. If you have sufficient space in ground, you can install the panels in ground also. In case of roof mounting, the roof must be strong enough to withstand the weight of mounting frame and panels apart from that, it must sustain strong wind also.
How to get govt subsidies on Solar systems?
Central Govt and State Govt give subsidies for solar energy systems. Normally you will get 30% of the total amount as Central Govt subsidy. Before installing the plant you must apply for that in prescribed format. One thing you must keep in mind that, it will be difficult to get the subsidy after installation without prior approval from the concerned agencies. You have to purchase the items from the MNRE (Ministry of New and Renewable energy) empanelled vendors only.
List of Manufacturers empanelled under Capital Subsidy scheme implemented through NABARD (as on 16-06-2013). The list contains contact numbers of all approved vendors across various parts of India. Even though you don’t want to get the subsidy, it is highly advisable to get the system installed from these vendors because they strictly comply with the necessary performance and technical standards.
State Nodal Agencies for Minister of New and Renewable Energy (MNRE)
Go through
this list to get the contact information of State wise Nodal centres of MNRE. You must contact the regional/district nodal centres before installing a solar home power plant. Apart from the 30% Central Govt subsidy, many state govts offer additional subsidies and other special schemes to promote alternate energy usage.
Source : http://www.techlineinfo.com/